
Showing posts with label Cricut. Show all posts
Showing posts with label Cricut. Show all posts
Saturday, December 3, 2011
Believe Banner
Tuesday, November 29, 2011
Christmas Countdown

I got a picture frame from the Dollar Tree, removed the glass, spray painted (and sanded to weather it a little) to match Scrapbook paper. I used my cricuit to cut out the numbers for the count down then cut out 13 pieces of paper to glue the numbers on and added some embellishments, I also took my red and green ink pads and inked each piece of paper. (example: I glued 1 and 2 , 3 and 4 back to back so I wouldn't have so many sheets) then I used the head of a tack and glued that on the paper to hang my binder clip on, I also added some fuzzy ribbon to hide the clip. I love the way it turned out. Now I just have to remember to change it everyday ;)

Wednesday, June 22, 2011
USA Banner

Wednesday, May 4, 2011
#8 Birthday Banner
BIRTHDAY PROJECT #8
Birthday Banner

Check out the link parties I participate in HERE
Sunday, May 1, 2011
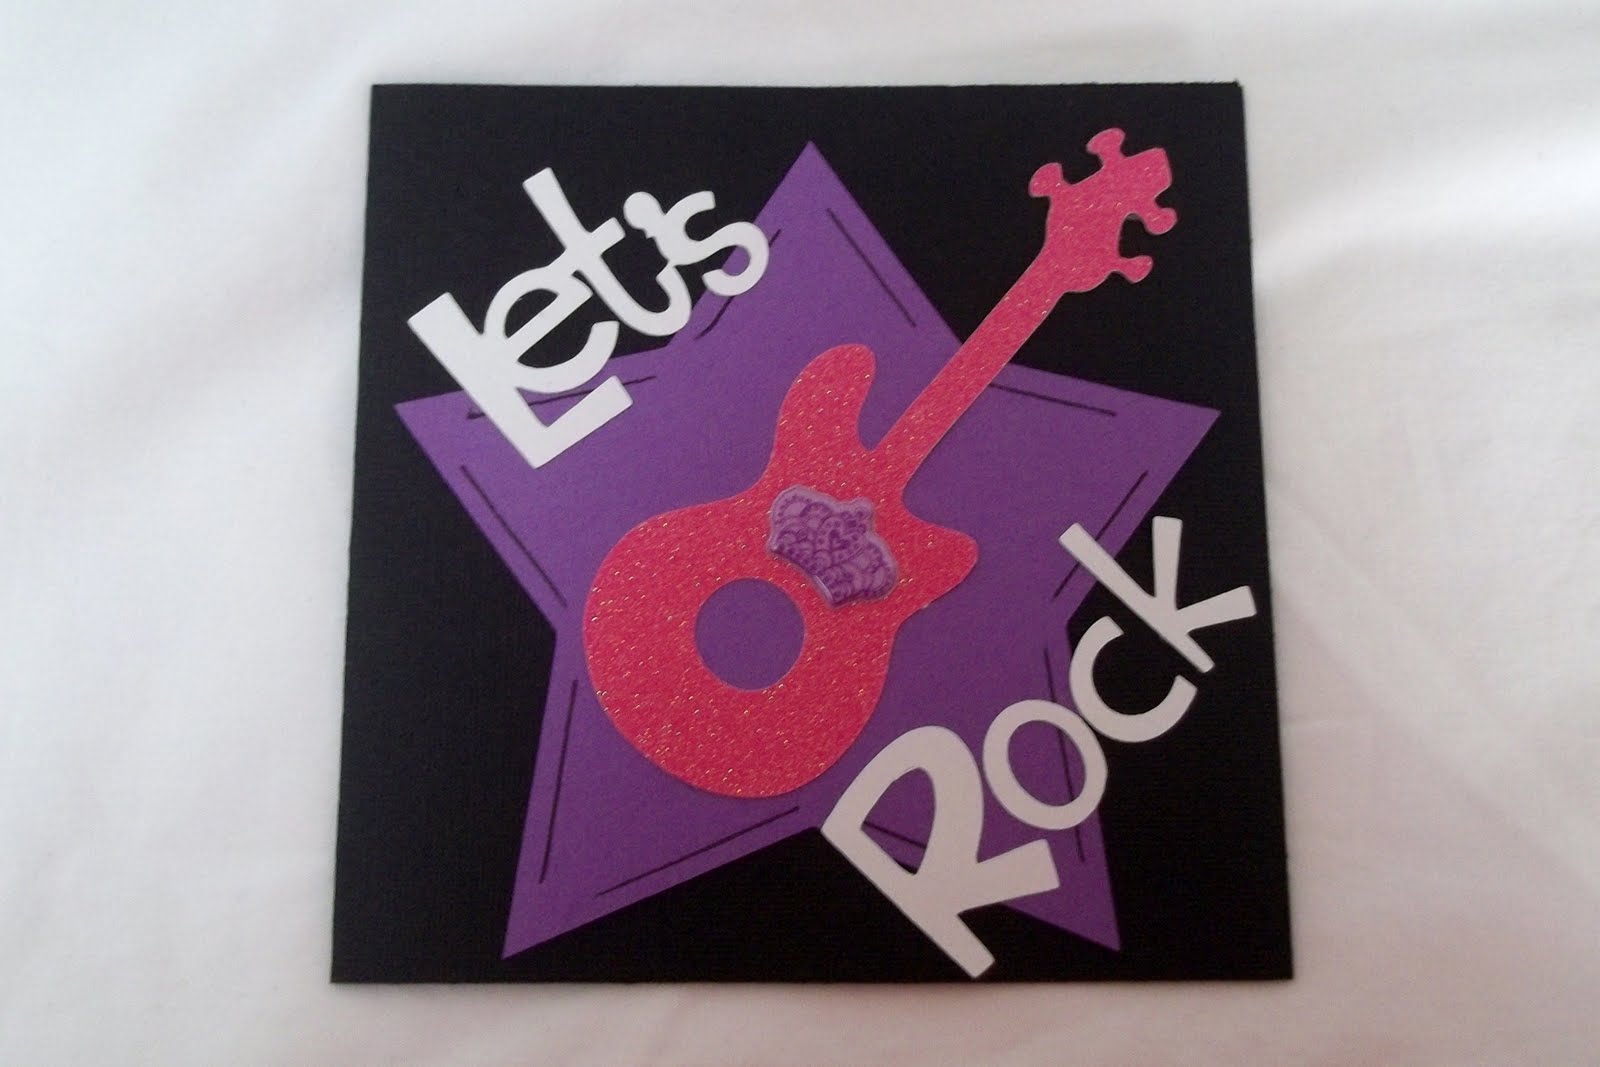
#5 Rock Princess Invites
BIRTHDAY PROJECT #5
Rock Princess Invites


Friday, April 29, 2011
#3 Cupcake Stand & Cupcake Picks
BIRTHDAY PROJECT #3
Cupcake Stand & Cupcake Picks

I got this stand on clearance after valentines at walmart for 2.00 with the intention of using it for this party because it was the perfect color. I just found some cute rock star ribbon at Micheal's (on sale of course) and glued it onto the edging to cover the hearts that were on it. Easy peasy! I will add a picture of it with our cupcakes on it in the final party pictures.

I ended up making these with my cricut. The guitar is from the everyday paper dolls cartridge, and the stars are from a creative memories hand punch. I cut out the number 4 on my cricut and glued them on. I then attached them to toothpicks with a piece of tape.
Check out the link parties I participate in HERE
Thursday, April 28, 2011
#2 HAPPY BIRTHDAY Blocks
BIRTHDAY PROJECT #2
HAPPY BIRTHDAY Blocks

I actually found these little 1/2in thick 2x3 blocks already cut and sanded in my grandpa's wood craft stash (minus 2). (He used to make all kinds of cute wood crafts but has since given it up except when I ask him to cut me out something). I just found a piece of scrap wood and cut out two more, painted them white then used my cricut to cut out HAPPY BIRTHDAY. I glued them on and added some cute birthday stickers I had. This project ended up being free cause I had everything on hand! Love them!
Check out the link parties I participate in HERE
#1 Balloon Wreath
BIRTHDAY PROJECT #1
Balloon Wreath

I originally found this idea Here but I have seen many versions of it around blog land, so here is my version. I apologize for no other how to pictures I am really bad at remembering to take them I get very engrossed in my projects.
Supplies:
wreath form (I used straw)
800 Water Balloons (1.00 for 100 pack dollar tree)
3 packs floral greening picks (600 about)
1 sheet tissue paper
matching scrapbook paper
Yes I used 800 balloons, You wouldn't need that many balloons but I wanted mine really full plus I used water balloons which are a lot smaller, I also added some ribbon in matching colors.
Start by taking a pick, stick the balloon in the middle and stick it into the wreath (about every other one, I used 2 different color balloons together in one pick to make it fuller.) Just do this OVER and OVER and OVER. I didn't cover all of the wreath.

I cut some tissue paper to cover the back side and just tucked it under the balloons using the picks along the inner and outer part of the circle where I stopped. (I wanted it to look a little nicer then just straw) I then cut out HAPPY BIRTHDAY with my cricut and glue/taped the letters on.
Check out the link parties I participate in HERE
Tuesday, April 26, 2011
Birthday Projects
ROCK PRINCESS BIRTHDAY PARTY


My daughter is into music and princesses right now so we thought of a Rock Princess themed party. The colors are going to be Dark Pink, Dark Purple, and Black. Along with the party stuff I also made some general birthday stuff to use every year to celebrate birthdays and make them a little more special! The coming week I have composed a new project for everyday. Keep checking back for free printables, recipes and some great birthday related crafting ideas.

Crafting List:
Happy Birthday Blocks
Cupcake Stand & Cupcake Picks
Table Tents, Fun Food Labels & Recipes
Rock Princess Invites
Birthday Balloon Wreath
Happy Birthday Banner
Rock Princess Tutu
Birthday Binder
Thank You tags/cards
Check out the link parties I particpate in!
Thursday, April 14, 2011
Spring Paper Flowers

I found these cute flowers at whimsical world of Laura bird and had to make them. She has a great tutorial Here.
If you notice I have 9 pedals instead of 8 like hers it will work either way. (I had this pretty 2 sided coordinating papers from Creative Memories.) I attached mine to some skewer sticks that I had painted green. I also cut out some leaves and a butterfly on my cricut. I stuck a styrofoam ball in the bottom of my bucket and added some green Easter grass for filler. This is going on my entry table after Easter is over for my Spring/Summer decor.
Check out the link parties I participate in HERE
Tuesday, March 15, 2011
Easter Banner

Another banner
I used my cricut as usual, some solid color scrap paper, some easter felt stickers from the Dollar Tree for emelishments, And some cute little closepins with butterflies on them (Micheal's dollar spot set of 6) Easy as pie!Check out the link parties I participate in HERE
Sunday, March 13, 2011
Quiet/Travel Activity Book


I am still thinking of more ideas for the book if you have any please let me know I would love to hear them.
Finishing touches:
I three hole punched all the laminated sheets, slid the magnetic sheets into a clear sleeve, added some dry erase markers into a binder pencil holder I had on hand and put everything into a binder I also had on hand. I just keep the cookie sheet with it for the paper dolls and I also have her pull out the magnetic sheets (shape and fish) and put those on the cookie sheet for extra magneticness (I know that's not a word but its late and I need to finish so I can go to bed ;) thank you all for reading I hope I inspired you to make a fun travel book. Please link up if you do I would love to see your ideas.
The files that I have links to are for personal use only please!
check out the link parties I participate in HERE
Tuesday, March 8, 2011
Spring Blocks

My Spring blocks!! I love them, I cut 3- 2x4's 8in,6in,4in and painted them. I used my cricut to cut out the watering can (stretch your imagination cartridge), word spring (stretch your imagination cartridge), and grass with flowers (platinum schoolbook cartridge), I didn't like the flowers so I just cut them off and used some creative memories stickers I had on hand. Lastly I stacked them and tide a spring ribbon around them.
Monday, March 7, 2011
Birthday Countdown Blocks

I cut out 2- 4x4 blocks and 1-8.5x2x4 block, Sanded and painted colors to match my birthday paper I had on hand in my scrapbook stuff. I then cut out squares of the paper just a little smaller then each side of the 4x4 blocks, and mod podged them on. I used my cricut and cut out numbers for each block-
First Block -0,1,2,6 or 9,7,8
Second Block -0,1,2,3,4,5
glued them on and mod podged over to protect them (They will be handled a lot). I added some chalk board paint to the front of the 2x4 so we can write the name of the person who is having the birthday.
check out the link parties I participate in HERE
Sunday, March 6, 2011
Wine a Little

I had some left over scrap wood that I cut down and painted A deep red then I used my cricut to cut out a saying "Wine a little you'll feel better". I used my sticker maker to adhere them to the wood, and added some wine glass and a bottle sticker, drilled 2 holes for some wire and your ready to hang.
(I didn't coat it with mod podge but you could, I am going to see how it holds up since its just hanging on the wall.)
Check out the link parties I participate in HERE
Wednesday, February 23, 2011

Lucky Clover Plate

I happened to find this candle plate at goodwill for a $1.00 and knew exactly what I was going to do with it.
I do not have vinyl but I have a cricut and a sticker maker. If you are worried about it coming off you could put a thin layer of mod podge over it also.
Check out the link parties I participate in HERE
Tuesday, February 22, 2011
Lucky Banner

Gotta have a banner for our fireplace!
Shamrock paper from hobby lobby
cray paper
my cricuit with the cuttin' up cartridge
I cut 5 circles out and cut my letters to fit. Then I just started bunching up the cray paper on the back side taping it as I went. I hung it on some gold ribbon with some mini clothes pins I had on hand.
Check out the link parties I participate in HERE
Saturday, February 5, 2011
2x4 St Patrick's Day Blocks

Check out the link parties I participate in HERE
2x4 Sweetheart Blocks

Check out the link parties I participate in HERE
Subscribe to:
Posts (Atom)